Wire numbering
You can configure automatic wire numbering in the program settings (F12) under Document - Wire numbering.
When enable wire numbering is checked, every new wire gets a number automatically. Check pad with leading zeros to pad wire numbers to a fixed number of digits (set in the number of digits field).
Alternatively, you can leave automatic numbering off and number all wires at once after the drawing is finished. The renumber now button does exactly that.
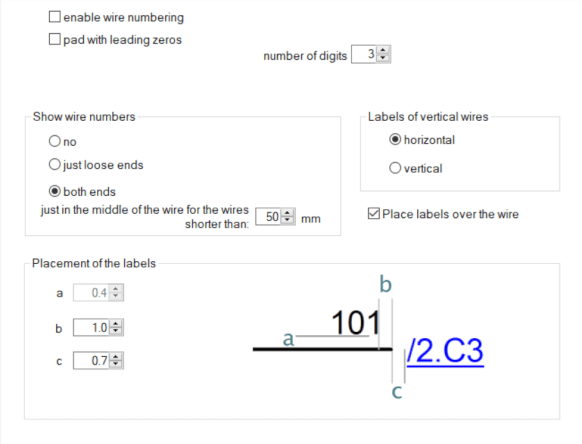
Where the numbers appear in the drawing
The Show wire numbers group decides where a label is placed:
- no — no labels in the drawing; the wires stay numbered and the numbers still appear in reports,
- free wire ends only — a label only where a wire does not continue,
- both ends — a label at both ends of the wire.
Two labels would not fit on a short wire. That is what the in the middle only for wires shorter than limit is for — shorter wires get a single label in the middle instead.
Appearance and placement of the labels
For vertical wires, choose whether the label is written horizontally (easier to read) or vertically along the wire (takes less room).
The Place labels over the wire option puts the number directly on the wire instead of beside it.
Moving an individual label
If the placement of one particular label does not suit you, grab it with the mouse and drag it. A label moved this way remembers its position — it is stored with the drawing and no longer follows the automatic placement.
The three values a, b and c in the settings set the default distances of the label from the wire, in millimetres; the preview inside the dialog shows which distance is which. The permitted ranges are 0.1–5 mm for a, 0.1–15 mm for b and 0.1–5 mm for c.
💡 Pro tip: Before labels could be dragged with the mouse, everything was tuned through a, b and c. Today the order is the other way round: leave the values at something that suits most wires, and fix the occasional clash with a symbol by dragging that one label.
