Tables
You can insert a table into a drawing to record various supplementary information – for example a list of building rooms, a list of motor terminals, a legend, etc. A table is an ordinary drawing object, placed alongside the other objects.
It is assumed that the table fits on the page and is not too large – a table is not paginated (not split across pages).
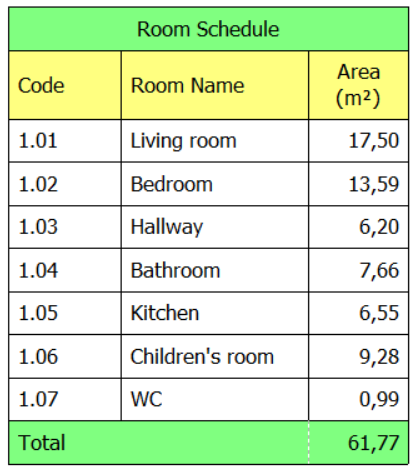
Inserting a table
- Choose the menu command Insert → Insert Table.
- In the dialog, enter the number of rows and the number of columns (1 to 100).
- After confirming, the table is inserted into the drawing.
The table is placed below the current mouse cursor position (snapped to the grid). If the cursor is outside the visible area, the table is inserted in the middle of the view.
The program remembers the last entered number of rows and columns and offers it the next time you insert a table.
Moving a table
A table cannot be moved by dragging its body. It is moved exclusively by the move handle in its top-left corner, which appears as a small four-way arrow (similar to a word processor) when the table is selected.
- Point at this handle (the cursor changes to a four-way arrow).
- Drag the table to the desired position.
Changing column widths
Each column has a handle on its right vertical edge (at the middle of the first row's height). When the table is selected:
- point at the right edge of a column (the cursor changes to a two-way horizontal arrow),
- drag to set the desired width.
Automatic width: As long as you have not changed a column's width manually, the column widens by itself so that the entered text fits. Once you set the width manually, the program considers it fixed and no longer changes it automatically.
Automatic height: The row height adapts automatically to the content. If the text does not fit the cell width, it wraps onto multiple lines and the table row grows accordingly.
Entering and editing text in cells
Double-click a cell to edit the text directly in the cell. The edit box grows while you type so that the whole (even wrapped) text is visible.
Keys while editing a cell:
| Key | Action |
|---|---|
| Enter | Confirms the text and ends editing |
| Alt+Enter | Inserts a line break (multi-line text in a cell) |
| Esc | Discards the changes and ends editing |
| Tab or right arrow | Confirms the cell and moves to the cell on the right |
| down arrow | Confirms the cell and moves to the cell below |
| clicking elsewhere | Confirms the text |
Moving to the adjacent cell (Tab / arrows) makes fast data entry easier. At the edge of the table no further movement occurs – the edit is just confirmed.
Selecting a block of cells
Formatting (fill, borders, merging) can be applied to a whole rectangular block of cells:
- First select the table (click it).
- Then drag inside the table to mark a block of cells.
If you do not select any block, the formatting commands from the context menu apply to the cell you right-clicked.
Context menu (right-click in a cell)
Right-click a cell to open a menu with these commands:
Rows
- Insert Row Above
- Insert Row Below
- Delete Row – available only if the table has more than one row
Columns
- Insert Column Left
- Insert Column Right
- Delete Column – available only if the table has more than one column
Column alignment
Submenu for the text alignment in the column; the current alignment is checked:
- Left
- Center
- Right
Fill
- Fill Color… – opens a color picker dialog and fills the block (or cell)
- No Fill – sets a transparent background
Borders
Submenu for the lines between cells and around the block (or cell):
- Show All – turns on all lines
- Hide All – turns off all lines
- Hide Inner – turns off only the inner lines of the block
- Hide Outer – turns off only the outer (perimeter) lines of the block
- Left / Top / Right / Bottom – turns on the respective outer side of the block
- Border Color… – opens a color picker dialog for the lines
Merging cells
- Merge Cells – available only when a block of several cells is selected. The block automatically expands to include whole previously merged cells – the result is always rectangular. Merged cells then behave as a single cell.
- Unmerge Cells – available only when the selected block contains a merged cell. Cancels the merge.
Table font
When the table is selected, you can use the standard formatting toolbar to set the font for the whole table – font name, size, bold, italic, underline and text color.
