How to Insert Symbols
Three ways to insert symbols into a drawing:
1) Symbols Graphically Panel
Hover over the symbols panel to see a palette of symbols from that group. Left-click to insert a symbol into the diagram. Right-click to open it in the symbol editor.
From here, the workflow is the same as with the text version of the symbols panel.
2) Favorites Panel
If you use certain symbols frequently, add them to the Favorites panel for quicker access.
3) Search Symbols Panel
Not sure which group a symbol belongs to? Use the Search Symbols panel to find symbols by name or keywords.
Transformers and Gates
Go to Insert - Transformer or Insert - Gate.
Click in the drawing to place the symbol. Then right-click it to open a dialog
where you can configure its properties (number of windings for transformers, gate type for gates).
Symbol Properties
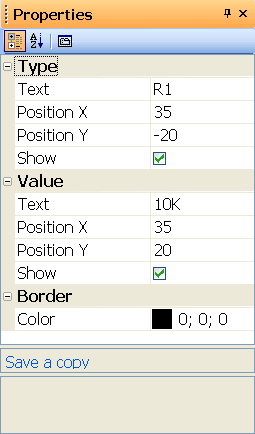
Double-click a symbol to open the Properties panel.
Every symbol has two key properties: reference and type.
Reference is a combination of letters and a number. The letters indicate what kind of component it is (e.g., R for resistor, C for capacitor, T for transistor), and the number is its sequential position in the drawing.
Type specifies the electrical characteristics -- for example, resistance in Ω, capacitance in pF, or a specific transistor model.
If a symbol didn't come from your library (e.g., you received the drawing from someone else),
you can save it using the Save a copy link to add it to your library.
Moving Symbols
Here's how to move symbols around:
- Click on the symbol with the left mouse button.
- Drag it to the desired position while holding the button.
-
Symbols snap to the grid automatically. To place a symbol off-grid,
hold
Shiftwhile dragging. - You can move multiple symbols at once if you've selected them first.
- For fine-tuning, use the arrow keys to nudge selected symbols one tenth of a millimeter at a time.
Automatic Numbering
Every symbol you insert gets automatically numbered. For example, if the reference letter is "R", symbols are labeled R1, R2, R3, and so on. If the symbol has no default designation, it simply gets a number: 1, 2, 3, etc.
Colored Schematic Symbols
To color a symbol, use Object - Border Color.
Color Fill for Symbols
Some symbols support color fill -- specifically those with closed shapes like circles, ellipses, rectangles, polygons, circular segments, and sectors.
Set the fill color in the Properties panel,
or use Object - Fill Color to fill multiple symbols at once.
Areas colored in the symbol editor keep their original color.
⚠️ When filling a symbol with color, some lines may disappear because the colored area covers them.
To fix this, open the symbol (right-click in the symbols panel) and reorder objects
in the Explorer panel -- move closed areas to the beginning of the list so they don't cover other elements.